How to Apply for FBR Digital Invoicing and get Security Tokens for Sandbox and Production Environment.
In this comprehensive guide we walk you through the complete process for obtaining both Sandbox and Production security tokens for FBR Digital Invoicing. The entire procedure is completed online, is free of charge, and is designed to be straightforward for technical and non-technical users alike. Follow the steps below carefully to ensure your integration is validated and your system is ready for production.
Step 1 — Select the Integrator
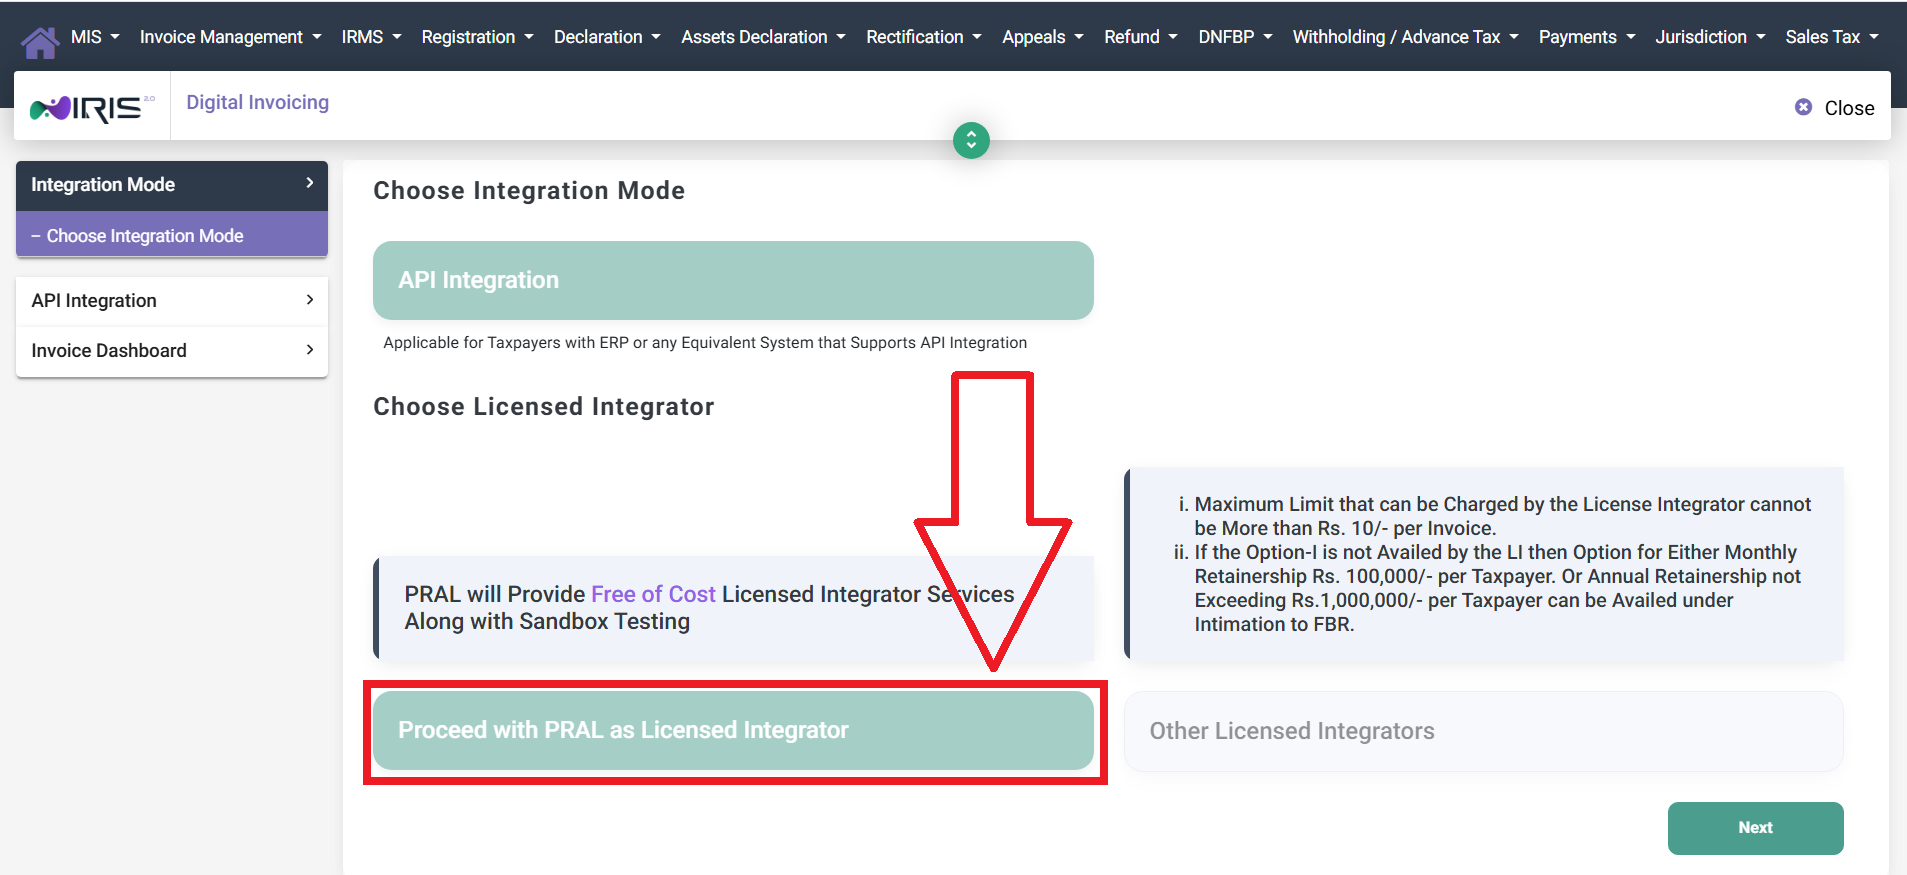 Image:
 selection of integrator
Step 2 — CRM User Details
Provide the CRM user details. Complete all fields accurately to ensure smooth communication and support.
- Technical Person Name: Name of the technical contact responsible for digital invoicing matters.
- Contact Number: Mobile number for the technical contact.
- Email Address: Official email for technical correspondence.
- Software Provider Name: The software you will use to upload invoices (e.g., NANU Digital Invoicing).
- Software Type: Cloud-based or On-Premises.
- Software Version: Current version of the chosen software.
- CRM User ID: This ID is used to log in to the DICRM portal provided by PRAL for support and complaints. By default the system may use the provided email as the CRM User ID; you may change it if required.
- CRM Password: Password for the DICRM portal login.
- Business Nature: Nature of your business (usually preselected but editable).
- Sector: This option is preselected by default but may be changed. Sandbox scenarios will be determined based on this selection, so choose the most appropriate sector for your operations.
Note: Entering a software provider here does not lock you into that vendor permanently. You may migrate to any compatible software solution at a later stage.
After completing all fields, click Next to proceed.
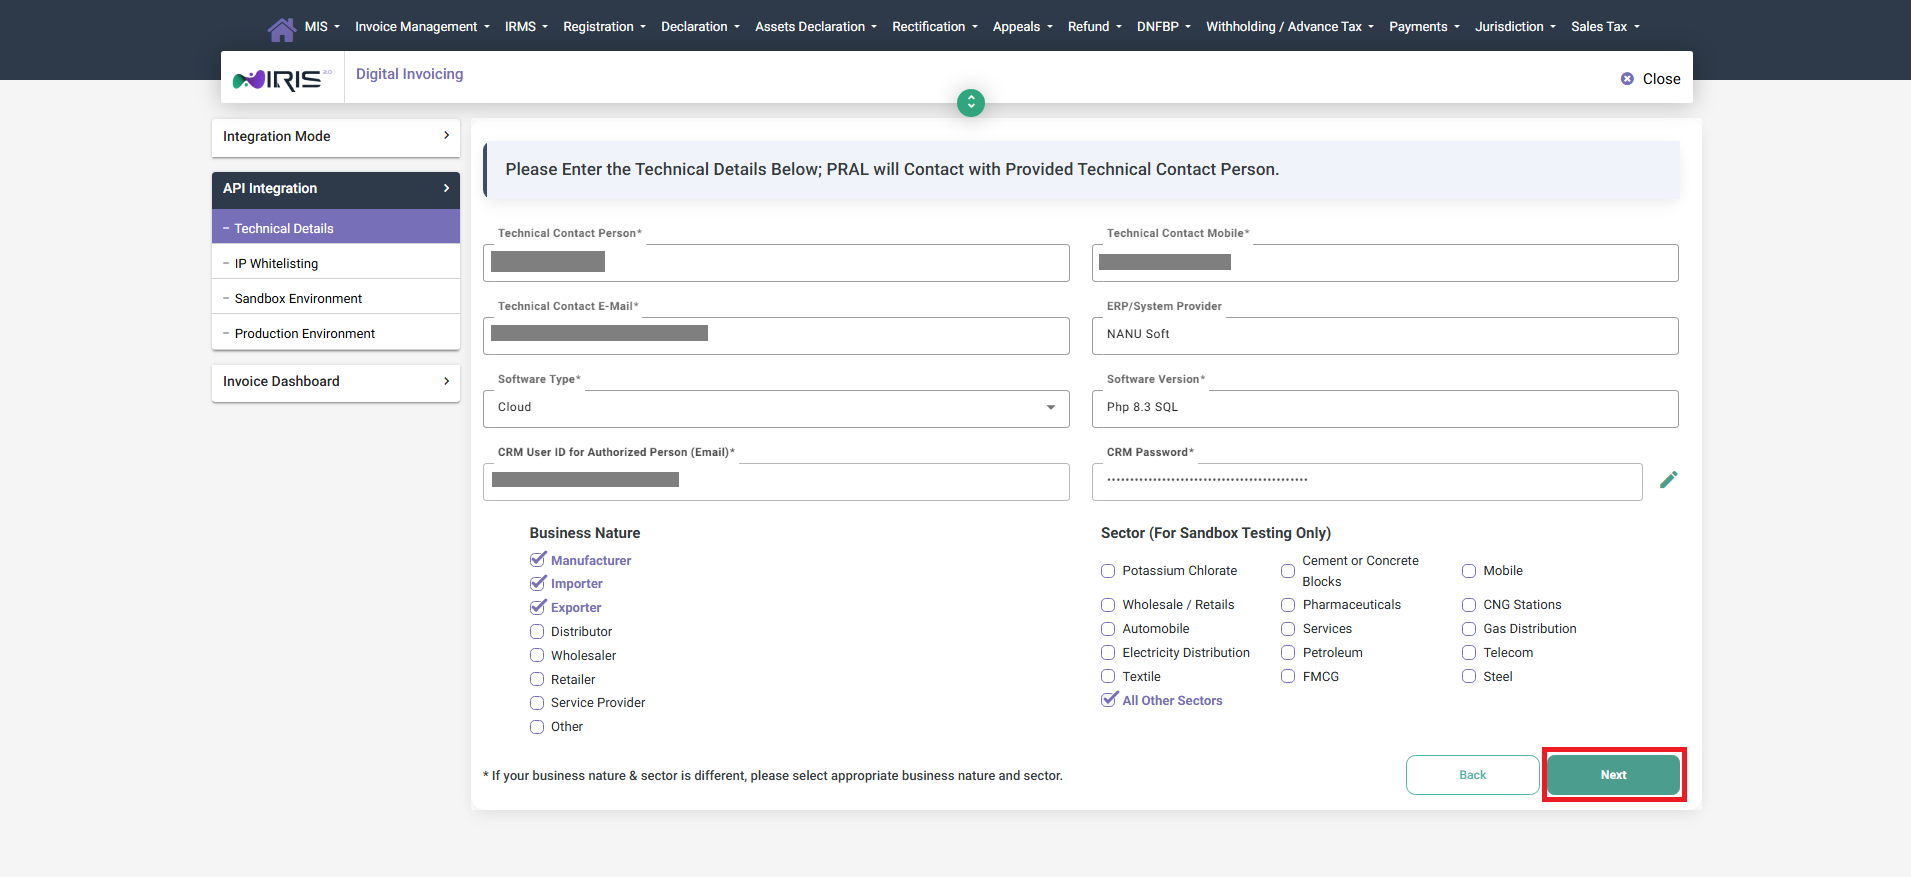 Image:
 CRM user details
Step 3 — Add IP Address
Enter the IP address that will be used to communicate with the digital invoicing server.
For desktop/on-premise software obtain a static IP from your ISP. For cloud solutions, the provider will supply the server IP.
After submitting the details the IP will appear in the table below. Click Next — you will receive a notification indicating that IP approval may take up to two hours. Click Next again to continue.
 Image:
 Static IP list
Step 4 — View Sandbox Scenarios
Once IP settings are approved you will arrive at the sandbox dashboard. This screen lists the eligible scenarios you must complete for production token approval. Click any scenario to view details.
The number of required scenarios may vary by business. The dashboard also shows successful and pending scenarios and lists sandbox invoices used for testing.
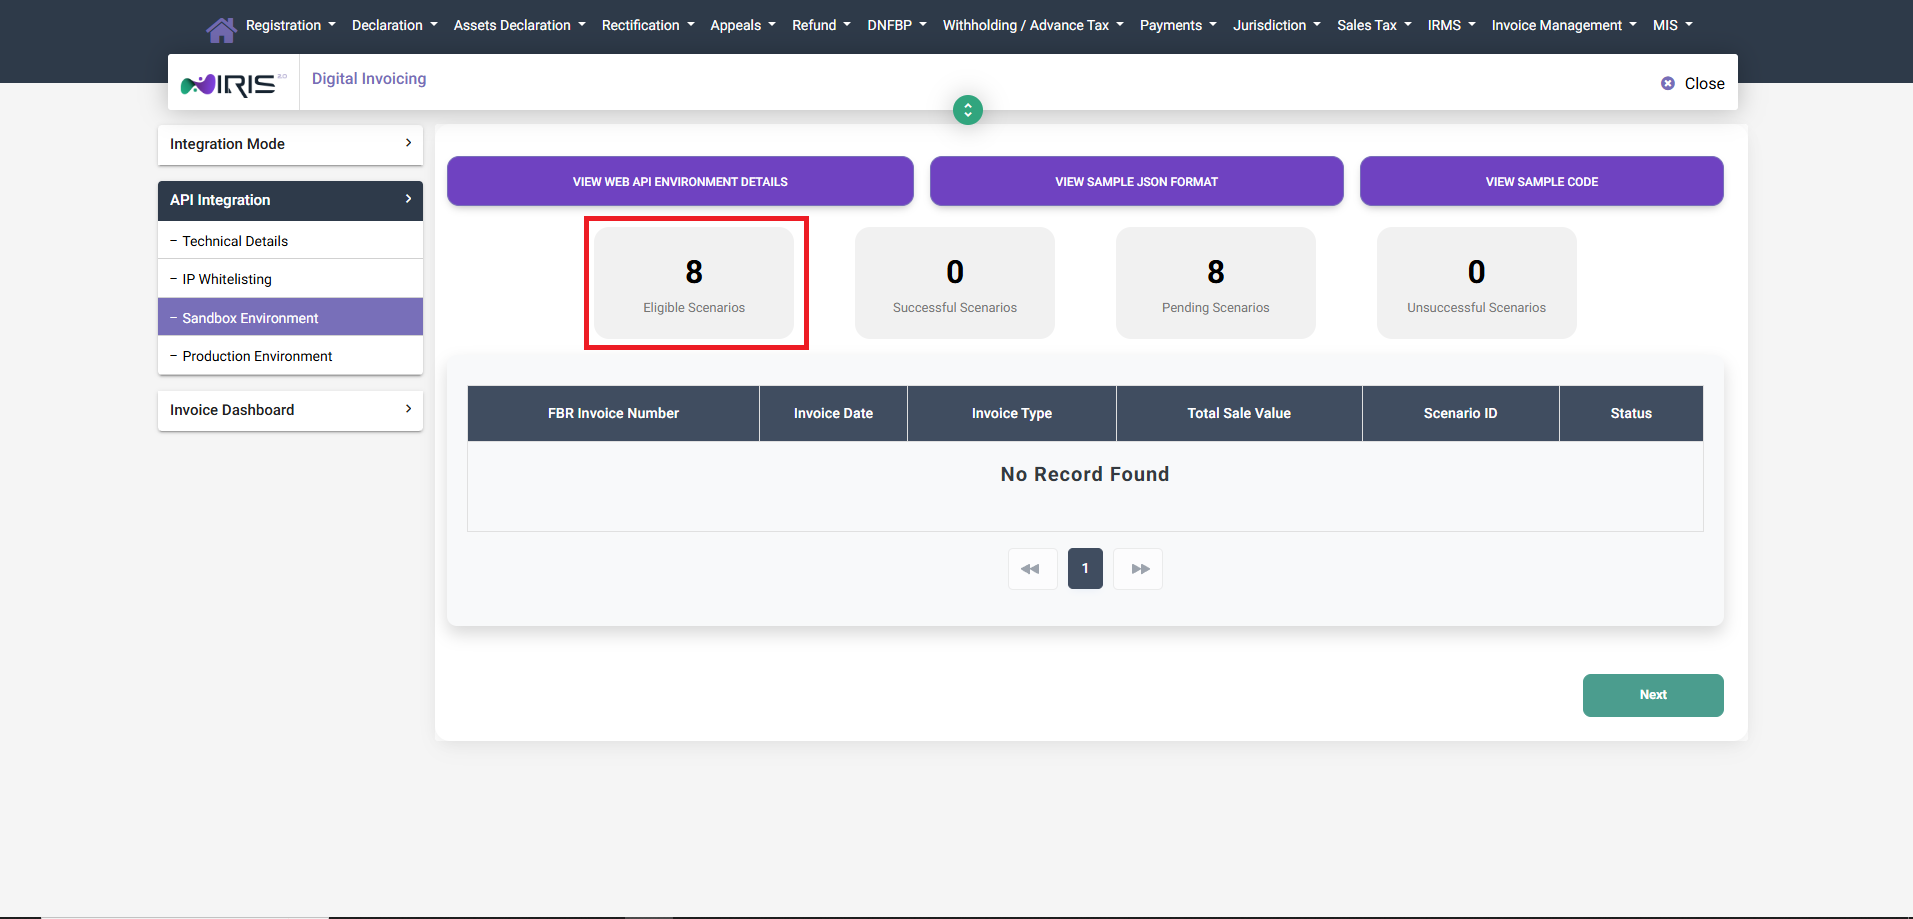 Image:
 Sandbox View
Step 5 — Scenario Details & Test Invoices
Click an eligible scenario to view the associated sale types and requirements. Post test invoices according to these scenarios to complete sandbox testing.
When preparing test data, ensure you include the correct scenario code and sale type. In some scenarios, SRO schedules or serial numbers are mandatory — these should be obtained via the reference APIs. Tax calculations may also vary by scenario; it is the integration software’s responsibility to apply the correct rules.
If you are using NANU Digital Invoicing, the system can automatically determine references and tax calculations for the selected scenarios, simplifying the testing process.
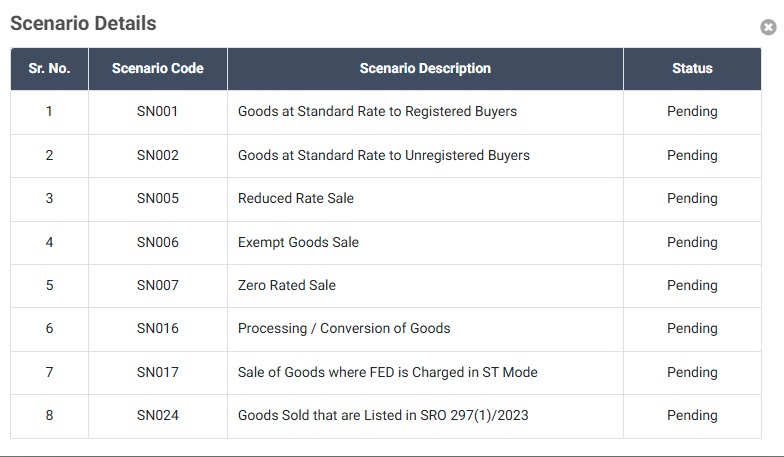 Image:
 Eligible scenerios
Step 6 — View Web API Environment Details
Click "VIEW WEB API ENVIRONMENT DETAILS" to display the sandbox security token. This token is required for your software to access the sandbox API endpoints.
 Image:
 Sandbox security token
Step 7 — Apply Token to Your Software
Copy the displayed sandbox token and paste it into your software’s DI API settings. For example, in NANU: Accounting → Digital Invoicing → DI API Settings, choose Sandbox, paste the token, and submit.
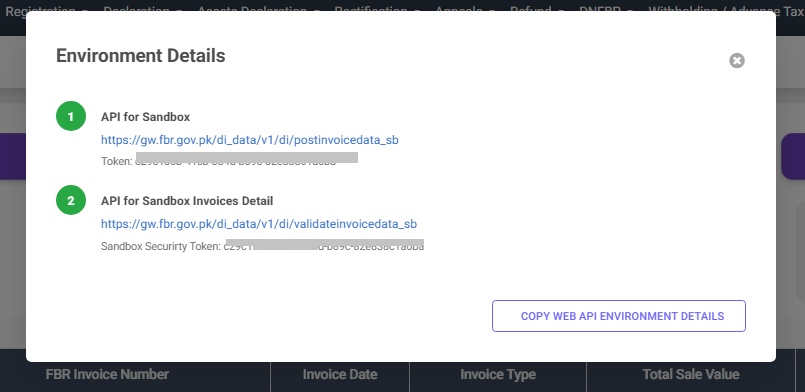 Image:
 Sandbox environment details
Step 8 — Complete All Test Scenarios
After submitting test invoices for every eligible scenario, the dashboard should show the same count for Successful scenarios as for Eligible scenarios. Pending and unsuccessful counts should be zero before proceeding.
NANU is offering the free of cost sandbox scenerio passing, Contact our representative to get the free account for sandbox testing.
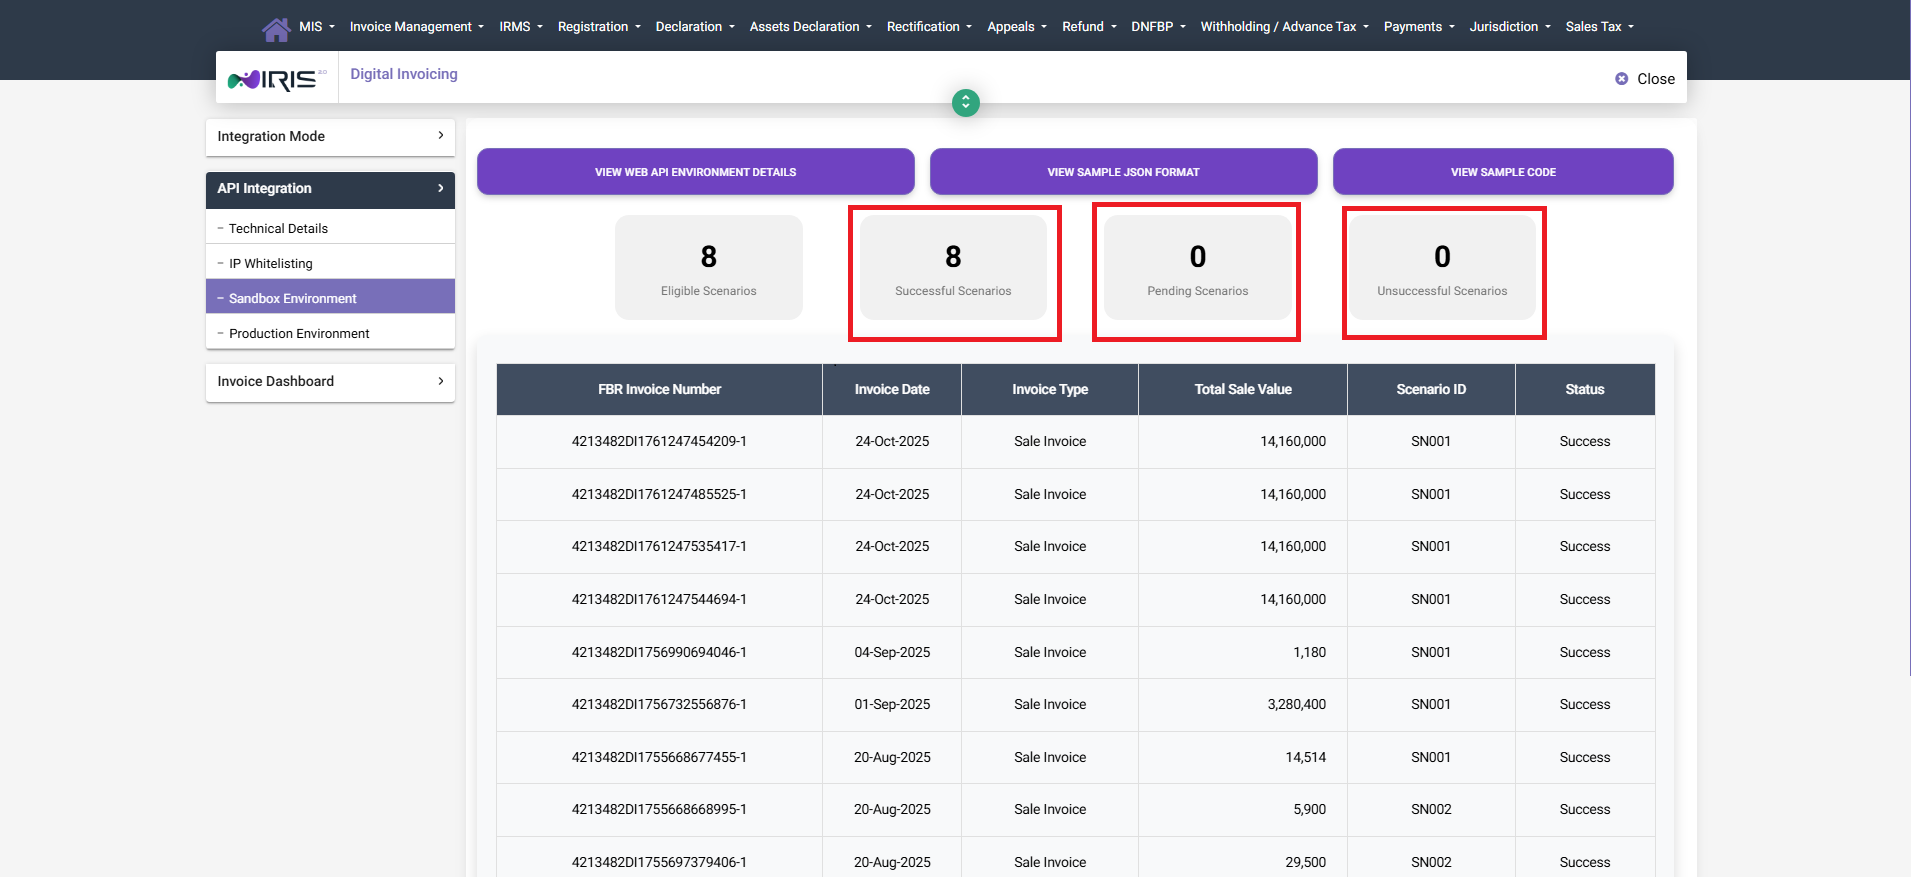 Image:
 Sandbox on scenerio completion
Step 9 — Request Production Token
Once all sandbox scenarios are successfully completed, switch to the Production environment and click "VIEW SECURITY TOKEN" to display the production token.
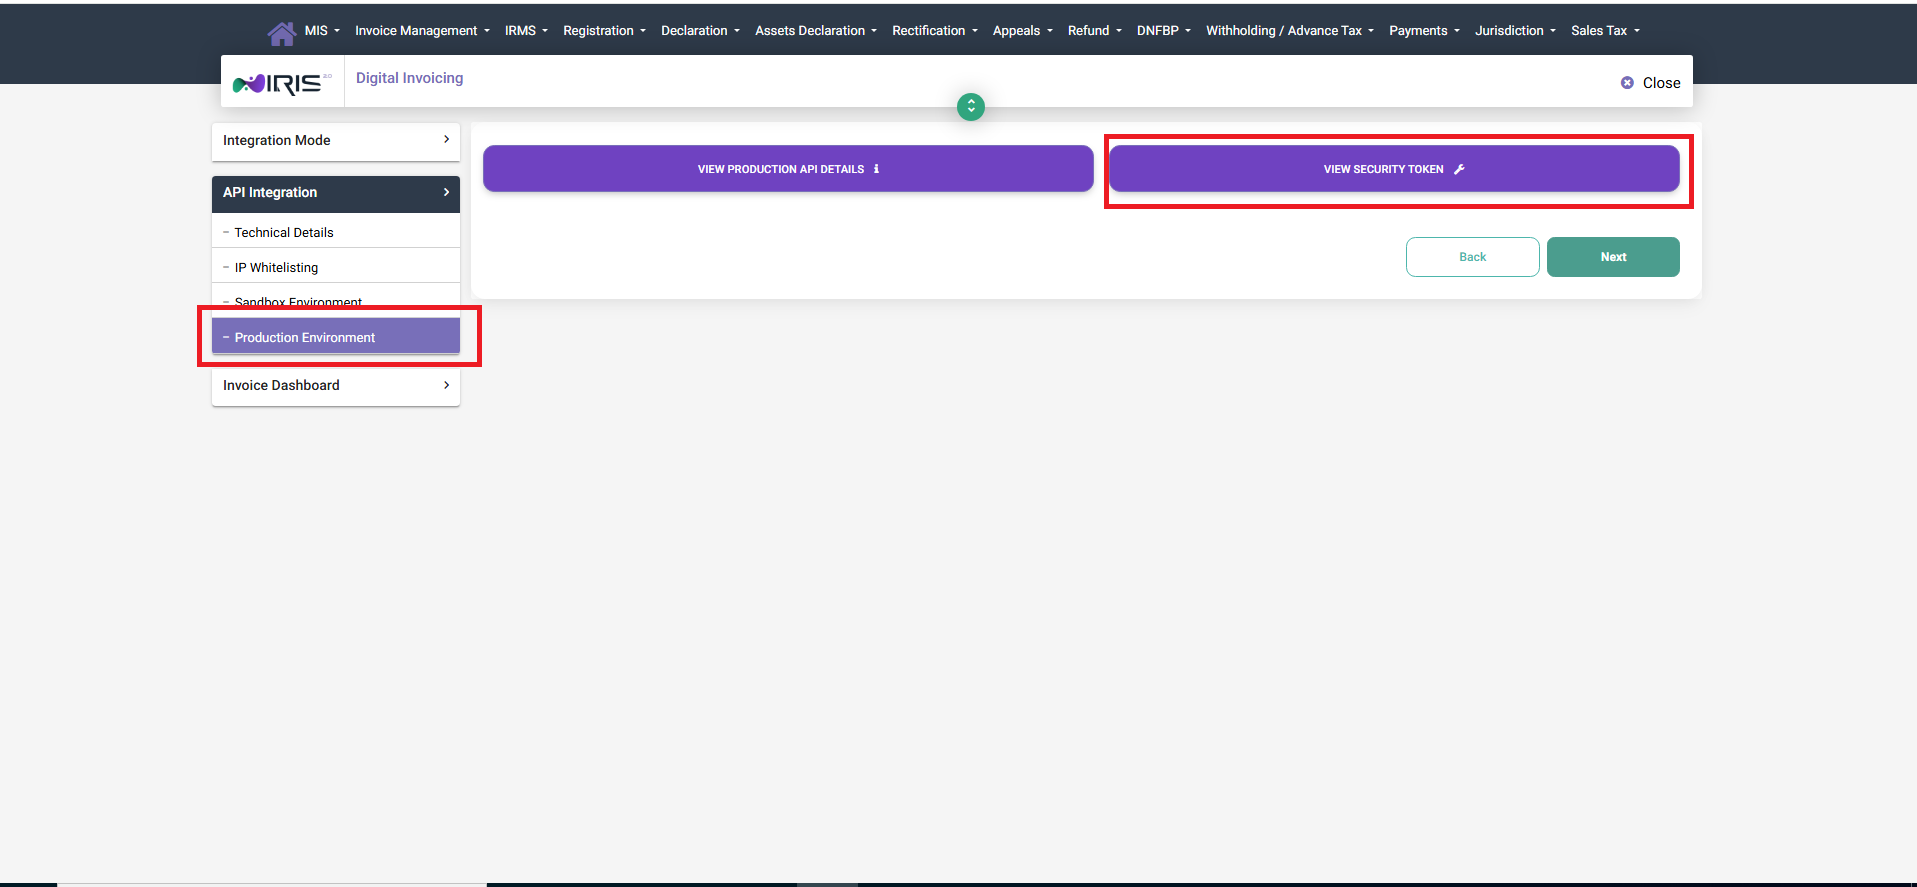 Image:
 Production environment
Step 10 — Securely Store Production Token
Copy the production token and save it securely in your software. This token authorizes posting of live invoices to the FBR processing endpoint (Anexture-C).
Important: Treat the production token as a confidential credential. Do not expose it publicly or share it with third parties unnecessarily — even software vendors do not require access to this token.
If you use NANU, the platform provides a secure input field and an option to remove or rotate the token whenever necessary.
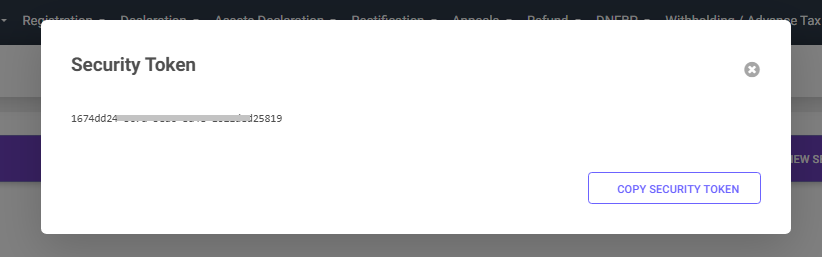 Image:
 Security token for Production
Step 11 — Confirm Integration
In production, after posting the first live invoice you should see an Integration Completed confirmation message at the top of the screen, confirming successful connectivity with FBR.
 Image:
 Integration completed
Step 12 — Review Dashboard & Reporting
The Summary Dashboard provides an overview of all invoices posted within the selected period. Use the dashboard to verify counts, statuses and to identify any exceptions that require attention.
 Image:
 Summary Dashbord
Additional — Search, View & Print Invoices
The search invoice section allows you to view invoice details for the selected period. From here you can view, download or print invoice records as required for reconciliation and audit purposes.
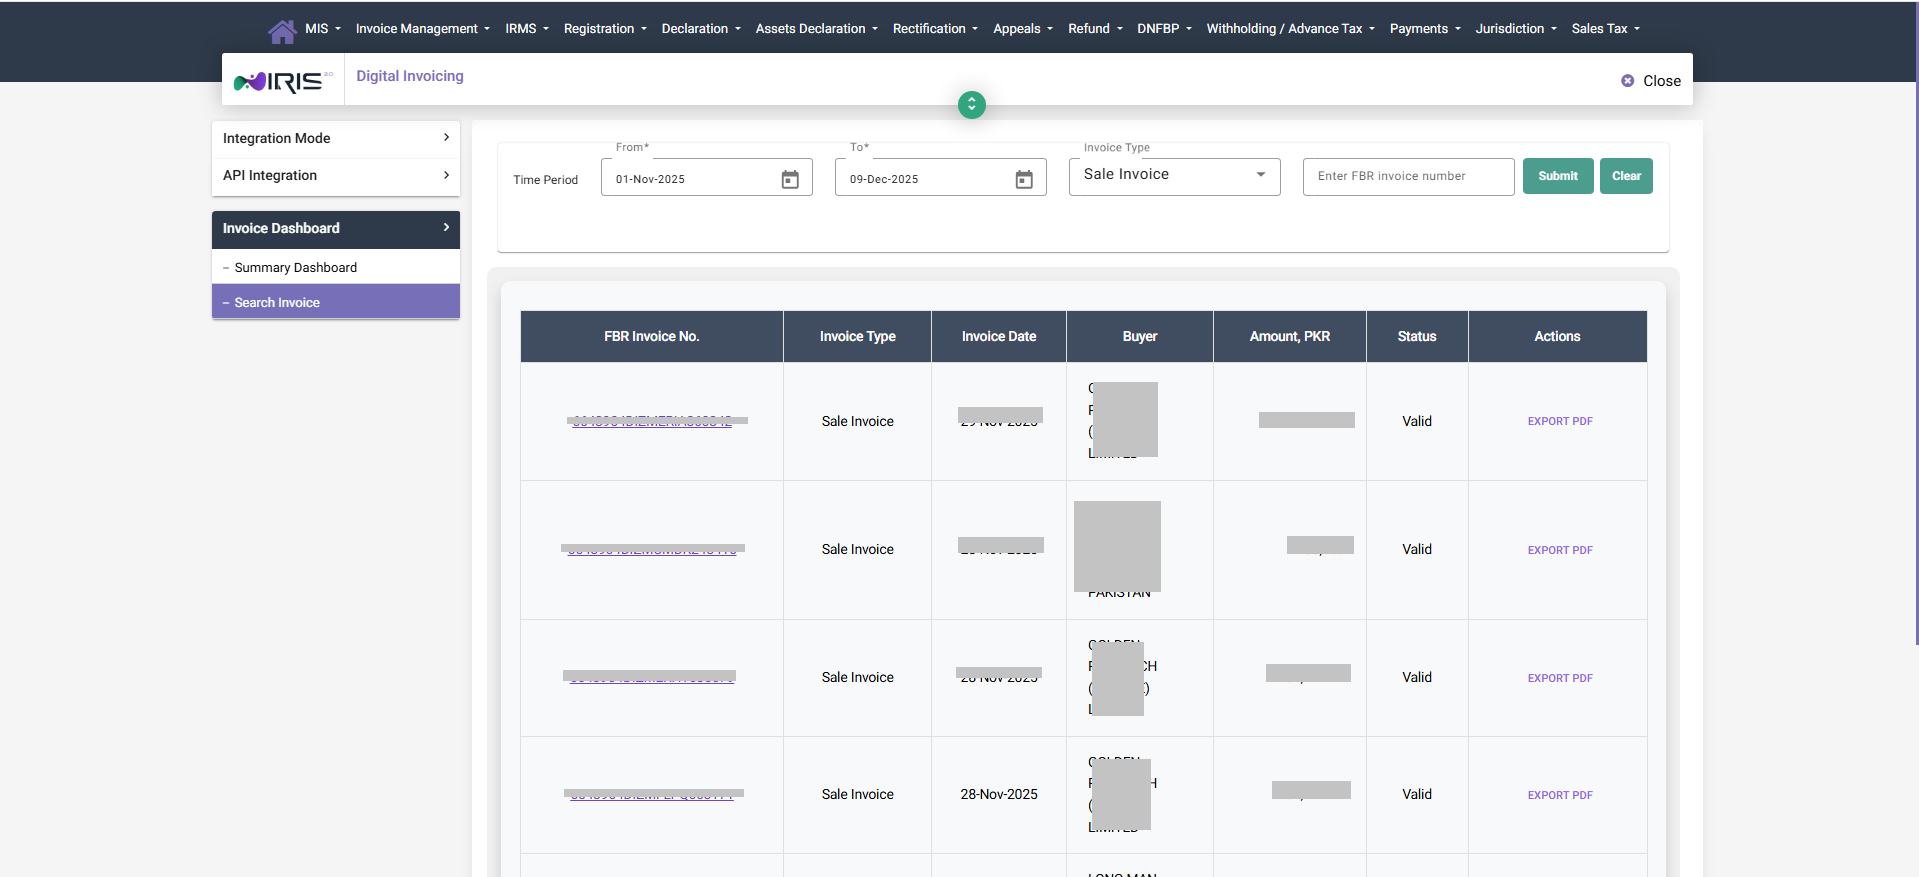 Image:
 Search Invoice